Monday, March 26, 2012

Garden Center Paint Out

Picture the last time you walked through a nice garden center in full bloom.   Mass groupings of colorful flowers and shrubs are everywhere you look.  Remember how good it smelled?

Crazy for Color
Our Friday painting class delighted in such a sensory experience at Kennedy's Garden Center in Scituate, thanks to theiraccomodating owners.  There were lots of scenes worth capturing - every direction.

I immediately gravitated to the front of the garden shop, where crocks of pansies, daffodils and hyacinths were clustered.   The archways and rustic shingles along with decorative garden ornaments were an irresistable backdrop.

Dilemma.   The class lesson was on the subtle, more muted attributes of Spring, such as leafless deciduous trees, the cool, bluish reflections of the sky on shiny evergreen leaves and warm shadows.   Color junky that I am, I knew that if I set up at the front of the Garden Shop, I would let the flowers dominate, and forget about the subject of the class - the pre-growing season look of March.  So I shake off the color delerium and come to terms with learning the subdued Spring landscape lesson.

Homemade view-finder taped
between canvas and umbrella
I would like to go back and paint that bright, color-splashed scene on another day.

I set up on a brick garden path under a wire arch between two of the buildings.   I had forgotten my view finder so I ripped a piece of paper out of my sketchbook.   Using my palette knife like a razor, I cut a out rectangle.  I used masking tape to position the paper frame between the pole of my umbrella my canvas.   This resulted in a "hands-free" way to frame my scene.  The only drawback was that I had to lean so far forward to see through it, that I couldn't see my canvas and view at the same time.   Once I had the scene sketched in
according to my gridlines, that was no longer an issue.
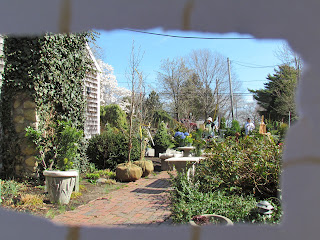
Looking through impromtu viewfinder
The picture to the left gives you an idea of what looking through my viewfinder was like...not exactly what I painted, but you get the idea.
It started as an overcast day and I liked the grey effect.  The major elements of my composition were the two young trees with burlap wrapped root balls on the left, the brick path that led out to the parking lot with a concrete bench, and a painter with canvas and easel further away to the right. 
Once the clouds gave way to full sunshine, the painter in view, my friend Colleen, switched from a plain, mid-value visor to a white straw hat.  All of a sudden, the bright sun on her hat commanded more attention and actually completed the composition for me, balancing the large burlaped root balls on the left.  Plastic ribbon tags dangled from the young saplings.  They seemed to balance the cool white hat and gloves. If there was an imaginary fulcrum in my painting, equalizing its elements, the fulcrum would be at the end of the brick path on the line that connects the young trees and Colleen.

Painting the Garden Center
In previous blogs I've lamented about temperature schemes.   Cool light and warm shadow seems logical to me.   The sun is warm and bright, and shadows are dark and cool, right?   Not always!  In this scene, the light is cool and the shadows are warm.   The cobalt blue sky is heavily influencing the lit surfaces. This translates to making the interior shadows of the bushes warm with burnt sienna, in contrast with the sky blue tipped bush tops. The planes of the root balls range from the warmest darkest shadow side, gradually cooled and lightened toward the brightest top right of the burlap balls.  

This is one of those paintings that I like better than the actual scene.    Let me know what you think.

Thursday, March 22, 2012

Spring!

I did something crazy today.   I used a white canvas.
What led to this unusual event?
Hyacinth, freesia and lemons set up
  1. I observed that my daffodil bulbs were within days of opening,
  2. I splurged on some bright yellow freesias and fragrant purple hyacinths at the greenhouse,
  3. A nice, new stack of lily white canvases arrived in the mail,
  4. I watched Daniel Keyes transform a blank canvas into a stunningly colorful fruit and floral still life on Youtube.
Spring!   A fresh new start.  A snow white canvas.  A great day to mix up a spectrum of yellows and purples on my palette.

I arranged the flowers in a mid-sized clear glass vase.   I pressed a bright white cotton linen cloth and grabbed two lemons.   I liked where this was going.   I enlisted my very willing composition expert - my husband - to help me create the set up.  To the right is a photo of the set up.    In reality, the shadows were not this blue, but rather they were lavender.

Stage 1- Sketch and shadows
After sketching in a grid of thirds and the outline of the flowers in diluted raw sienna, I studied the big shapes.  One of the things I liked best about this set up is the pattern of shadows - big fuzzy circles, triangles and quadrilaterals.   There also were some nice feathery stem shadows that overlapped other shadows.   In the places that there was overlap, the shadow was darker - but just slightly.  

The darkest dark was the shaded side of the purple hyacinths.   The freesia stems were also dark, but I decide to wait until I have at least a couple of coats of paint on the background so as to not start dragging green through my nice white linen....so unlike me.  The white-on-white stripes on the linens were so striking that I wanted them to play a role instead of just blocking in a background of light and shadow.  This was a bit scary, because the stripes were standing out and were a bit distracting throughout the painting process.    My plan was to continue to glaze over the stripes until they sat back properly.
Stage 2 -
Linen Stripes and Block in

Stage 3 -
 Tablecloth and background glaze

Stage 4 -
Stems with Buds
The linen stripes continue to show through the layers of glaze.  The end result should be an understated hint of stripes, not the pronounced look of Stages 4, 5 and 6.  I want the lightest yellow of the freesias to be painted last with thick buttery yellow.  

Stage 5 -
Lemons and Freesia Petals
The front lemon was brightly lit except for a slight shadow cast from the linen at the bottom.  The rear lemon was quite dark and as you can see, as of Stage 6, it was still too light compared to the photo at top.
Stage 6 -
Hyacinth highlights
Each of these stages were done on consecutive days.

Stage 7 -
Freesia Petals and Lemons


This last picture, Stage 8, is close enough to complete that I will put it aside, and revisit in a week or two.  Comments and suggestions welcome.

Spring Blooms with Lemons