Showing posts with label studio. Show all posts

Thursday, December 19, 2019

Christmas Tea Pot

Christmas Teapot

With Christmas decorations all around, setting up a still life was relatively easy.    My Christmas teapot, given to me a long time ago by my mother usually gets a lot of use during this season, but this year it remains on display for painting reference purposes.  It sits next to my shell angel, gumdrop sticks and ornaments.

I hope you are enjoying all of your traditional decor in your homes, and the fond memories that they bring!

Thursday, April 25, 2019

Lilacs

Lilacs
I was pulling out my Easter/Spring decor when I found a lilac-scented candle.  After lighting it, the house was filled with its scent which was remarkably strong and authentic. It then struck me that we now have some lilac bushes at this new house/studio.     I am longing to see my very own lilacs for the first time this May - for enjoyment and of course, painting.

In preparation for the real thing, I practiced from a photo in painting this 6x6 inch mini.  I used a color mixing scheme that I learned about online in which a premixed pile of cool, light gray is used to blend with each color applied in the painting.   All colors had a bit of the gray, except for the brightest light, which I wanted to be bright and clean and warm.   I'm thinking the use of this gray harmonized the blues and purples to a softer, less intense palette.  What do you think?   Too muted?

Monday, January 21, 2019

New Day

New Day
I used a 12x16 virgin white canvas for this one.   The "wipe out" method is always fun and interesting and yet, somewhat unpredictable.   For a cold day in January, shaking it up would be just the thing!   I moistened the canvas with Gamsol.   This is done so that the initial pigment applied is not absorbed so intensely, still allowing wiping out to the pure white base.    So apply the paint just to turn around and wipe it off you may ask?   Yes.

Transparent colors were used to stain the canvas including  Chromatic Black (Gamblin), Asphaltum (transparent brown), Ultramarine blue.   These colors, when smeared together blended to a mid-range neutral tone.  After twenty to thirty minutes, this underpainting was set enough to start "reverse painting."   I took a smooth Viva paper towel and started wiping out the lightest lights of my reference photo.    This simplified painting process yielded a monochromatic - almost print-like result.  The lack of color gave more impact to the powerful pose itself.  Who is she?   What is the message?  Is is finished?   All good questions that you or I could answer with equal accuracy!

Wednesday, January 16, 2019

Dapper

Boy in the Tweed Cap (aka.- Dapper)


The light and shadow pattern from this young boy's stylish cap over his face made me think this shot had the makings of an interesting portrait.  It seemed like he was about eight or nine and still had the chubby cheeks of childhood.  No doubt about it, this is a dapper look!

Monday, April 2, 2018

Rocks and Seals - Take Two

Brant Rock Seals
There is a section of rocky coastline between the Green Harbor River and the Brant Rock neck section of Marshfield, MA that has become home for a small seal population.   At low tide, the seals can be seen sunning themselves on the more distant rocks.  They actually looked like rocks themselves, except that the shape was a little different - two pointed ends (head and tail :)).

The seals were the highlight of this paint out, along with the mild temperatures and calm seas.  As for the painting, there were challenges.  I've been painting a lot of rocks and surf lately so I mistakenly thought it would go smoothly.  I set up on the (sinking) sand, near the (rising) water line, just down from the (windy) opening along Ocean Street.   I began sketching the myriad of rocks and boulders connecting the abstract dark shapes across the scene.   Fast forward one hour...the easel blew over and I couldn't seem to get set up the same way again.   I painted for a few more minutes holding the board in my hand, working around the sand and gravel on my palette.  Arrggrrhhh!  I remind myself that a bad day painting on the beach beats a great day in an office every time!

The painting was only about 60% complete when I packed up.  That was a year ago.   I just found this painting again and with fresh eyes, saw what it needed.   So this is "Take Two" with a few improvements - I think.

Here's a paint-out bonus...a short clip of the seals.

https://youtu.be/-sd13uJa2gw

Sunday, February 25, 2018

Blinding Bridge Light

Blinding Bridge Light - Strolling at Sunset
In the quaint village area of Mystic, CT, a 1920 vintage bascule bridge spans the Mystic River, and carries vehicle and pedestrians within the tourist district of town.   This amazing bridge is opened for five minutes at forty minutes past the hour for six months of the year.   The concrete filled counterweights hoist the 85 foot movable span into the air allowing boat traffic to pass beneath.   Rather than feeling inconvenienced for having to wait, most people, including us, seemed truly fascinated with this engineering marvel, a wholly mechanical spectacle in an (overly) digital world.

Toward dusk we began to walk over the bridge to find the spice shop we had spotted on our map.   The sun was directly ahead, a golden, blinding type of glare, and it was casting long figure shadows toward us.   The light and shadows on the bridge made fascinating shadow effects, and the sun obliterated the bridge crossbeams, creating a blindspot effect that I have tried to mimic in the painting.


Tuesday, December 19, 2017

Christmas Carol and Red Ribbon

Christmas Carol and Red Ribbon
All the Christmas decorations are up and over the years, like many people, we have added to our collection.   I selected a few favorite items and combined them on the still life shelf in my studio.   This still life features some "rustic" pieces (a basket, greens, pine cones, berries and a book.) 

In our house, "A Christmas Carol" is a favorite, both book and movie (George C. Scott version :)).  That is why this was the volume featured in this Christmas still life. 

See Starry Snowman (previous post) blog for the photo of my studio still life shelf with two still life set ups, one of which is this featured piece.

BUY NOW

Saturday, September 30, 2017

Hydrangeas and White Aster

Hydrangeas and White Aster
I love having fresh flowers in the house.  They can be wild blooms (a.k.a. weeds), flowers and roses from my garden, or a professional bouquet.    The arrangement in this painting was sent to me by a very special lady who wanted to come to my Studio Sale, but could not make it.    She sent me this beautiful arrangement to wish me luck on this undertaking.  It was the ultimate in not necessary, but I did get maximum enjoyment from them.  Thank you!

I loved the unusual color combination of blue hydrangeas, white asters and lime green mums.  It even had a couple of pieces of driftwood as accents.   I immediately began plotting when I was going to have time to capture the blooms in paint, given the amount of time needed for the sale and post sale activities!

Monday, November 2, 2015

Rocks and Seals

There is a section of rocky coastline between the Green Harbor River and the Brant Rock neck section of Marshfield, MA that has become home for a small seal population.   At low tide, the seals can be seen sunning themselves on the more distant rocks.  They actually looked like rocks themselves, except that the shape was a little different - two pointed ends (head and tail :)).

The seals were the highlight of this paint out, along with the mild temperatures and calm seas.  As for the painting, there were challenges.  I've been painting a lot of rocks and surf lately so I mistakenly thought it would go smoothly.  I set up on the (sinking) sand, near the (rising) water line, just down from the (windy) opening along Ocean Street.   I began sketching the myriad of rocks and boulders connecting the abstract dark shapes across the scene.   Fast forward one hour...the easel blew over and I couldn't seem to get set up the same way again.   I painted for a few more minutes holding the board in my hand, working around the sand and gravel on my palette.  Arrggrrhhh!  I remind myself that a bad day painting on the beach beats a great day in an office every time!

The painting was only about 60% complete when I packed up.  The remainder was done in the studio - and it still isn't quite done.   I'm sharing it now, but I think it needs something.   Maybe a unifying toned glaze to tone down the bright areas on the rocks.   I welcome your critiques as always. 

Here's a paint out bonus...
a short clip of the seals.

https://youtu.be/-sd13uJa2gw

Tuesday, December 31, 2013

Terracotta, Alabaster or Bust

Meet my new model.   I recently found her sitting outside a collector/secondhand shop in Billerica, Massachusettss. I spotted her while eating across the street at Mikey's Roast Beef on Routh 3A. (The Roast Beef part is really a misnomer, because they have the best haddock sandwich you'll ever eat and the bonus it that it is an easy, informal sub shop type atmosphere.)  Anyway, while eating in and staring out the plate glass windows, her head was visible amid a chaotic jumble of other secondhand junk - or should I say - treasure.
Freshly Painted

Twenty-five dollars and a lengthy promotional speech later about what a good deal this was by the shop owner, and we were placing her - in all her heftiness - in the back seat for the ride to her new home.   I have been googling her description as well as the numbers on the bottom of the cast bottom base, but haven't found any information as to an original statue that may have been the inspiration.  Further, I'm not sure what she is made of.  She is very heavy.  The color looks like terracotta, but the fact that she was out in the elements without sustaining chips, or crumbling made me think it was something stronger.   (I know nothing about sculpting and related materials).   The only drawback for my purposes was that she had streaked and irregular coloring from sun exposure.
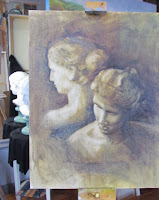
Ailbhe Back to Mirror - Stage One

Well now she is painted white and I am very happy with how she came out.   The sun streaks are gone and although she isn't a high end bust that can run quite a bit of money, she has nice even coloring and is perfect for my studio use.   She's not from money; she's just a regular gal.

I thought about naming her Terri, but she is probably not terracotta, and has since undergone a change in color.

I thought about Blanche, but she doesn't look like a Blanche to me.  (That name brings to mind Blanche on the Golden Girls).

Alabaster, the translucent gypsum material, made me consider Ali.  In this, the year of exploring my Irish roots, I decided on "Ailbhe," an Irish Gaelic name meaning "white."

I used the academic realist technique to produce an accurate drawing looking down at the bust which was also reflected in the studio mirror.   I started with the paper folding technique that I learned from Dianne Paranelli Miller, but instead of using multiple strips for length and width, I put my own spin on measuring with a single piece of paper.   I repeatedly measured until my light and dark areas were line drawn.  I used a thin mix of tranparent oxide brown and ultramarine blue to fil in all the darks.   With a paper towel, I then worked to wipe out all the light areas until it was accurate again.  I did three subsequent sessions of perfeting the light/dark rendering and still to this point the light areas were "no-paint" zones and the dark areas were transparent washes.

I decided to leave the transparent dark areas thin and dark and mixed up opaque flesh color for the lightest lights which were very cool.   As the planes turned away from the light, I warmed the color - within the lightest value.   The darkest skin values were warm darks and at first probably too dark.   

I've painted the lights again in subsequent painting sessions.   Since I have cool light on her, and wanted to add color, I mixed up cool pink and cool green for her hair.   For the flesh, I used my lightest flesh color (naples yellow, cadmium red and flake white), then warm tones for the darks using warm greens and burnt sienna.

I darkened the background and painted in over the figure on the dark sides so as to lose those edges.  

When I view the photo of this painting as a thumbnail, I feel like I want the left shoulder and its reflection to merge in value.   What does everyone else think?

Ailbhe Back to Mirror - Stage Two

Ailbhe in the Mirror


Thursday, May 31, 2012

Studio Still Life Shelf

My husband is not only an extraordinary engineer, but a talented carpenter.  There is obvious overlap between the talents needed by the two vocations.    An engineer's primary responsibility is to analyze problems and design solutions.   Carpenters perform similar functions albeit in a much more tactile way.    So into one person, add expert problem analysis, elegant solution design and skilled wood working and then you have my husband.   (Did I mention that he is sweet, loving and kind as well?)

There are many features of my dream studio that I love, the marshview probably topping the list.   Other plusses include a slider to an open air deck, 12-14 inch reclaimed wood board flooring, separate warm and cool track lighting, and storage space for canvases, all thanks to my designer and carpenter extraordinaire.  

One very functional feature that stands out for me is my still life shelf.   The spotlight for this post is on this mini-innovation that my husband conceived and implemented.   Prior to this invention, my studio had shelves but they were not the optimal height for my still life set ups.   I had been stacking an old wooden box and/or books to build up a platform to the height I wanted for a still life.      I would then lean a piece of foamcore against a tall object to keep it upright.   To that I would clip fabric to the foamcore and drape it down onto the surface I had stacked up.

Still Life Shelf Stowed
This photo shows the addition of the still life shelf just under the long existing shelf in the stowed position, taking up very little space.    By pulling the black knob, the wood assembly slides out on heavy duty drawer tracks.


Still Life Shelf Pulled All the Way Out
 This photo shows the wood shelf assembly pulled all the way out.  I could use it just like this - a plain, flat surface, but that's not all.


Removing Horizonal Bar from Stowed Position
It may be difficult to see what is happening here, but this horizonal bracket comes off before the backdrop can be opened.


Fully Opened Still Life Shelf
The black knob is used to open up the backdrop which is hinged to the shelf bottom.   The horizonal bracket is then reinstalled across the front of the backdrop to keep it upright.

Since I am short, this is a good height for me.   I can drape fabric over the back and clip a spotlight to the front or sides.   It is handy to have a reserved spot in the studio that can stay set up for as long as needed.    When no still life is in progress, I can neatly fold the shelf away to save space.

If anyone has questions about it, let me know.

Thank you to my husband in helping me create my wonderful, dedicated, workspace - with the great shelf...